Sunday, September 18, 2005
Like a Jeweler's Case
kitchen31
Originally uploaded by Michael Browne.
I have to say, this stuff looks good. All I need are some felt-lined boxes to go with this highly coveted polished natural stone.
I am very impressed with the way this stuff came out. I rushed into choosing finishes at the store today, and I wasn't sure about having teflon impregnated in the stone, but with a durable finish overtop, I don't think it will scratch easily or hold water marks. But hey, even if it does, that's just the character of a place.
Another Angle...
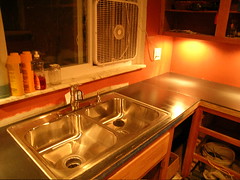
kitchen32
Originally uploaded by Michael Browne.
Here's the other view of the sink. You can see the seam to the right of the sink. Looking back now, I suppose I could have gone with one seam, but a more difficult cut. I'm confident with cutting the stuf now, but when you're working with materials you can't find in the store, I took the safer approach and cut what I knew I could.
The swithbox to the right of the box fan controls the garbage disposal. I suppose it would be more convenient to have the switch to the left of the sink, but that's where the undercabinet and overhead light controls were placed. I like to think of it as a safety precaution--there's no way your hand will be in the trap if you're flipping the switch.
Mmmm... Stainless
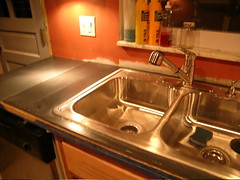
kitchen35
Originally uploaded by Michael Browne.
Here's a sink shot for you. To the left, you'll see the seam required by my chalkboards being only 72", not the 74.5" I neeeded to get to the seam to the right of the sink.
So, it's a good seam nonetheless. Notice the exposed plywood--that will go away when the trim (currenly in the varnish and polyurethane departments) gets installed.
The faucet is really cool. On sale at the Depot for $50, in a great finish, too!
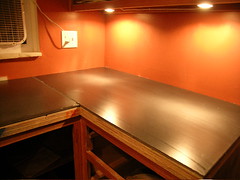
Room Divider Piece
kitchen34
Originally uploaded by Michael Browne.
This piece, I'm more proud of. The mounting needs some help though. Note the supporting mop handle. Brackets are in this countertop's future.
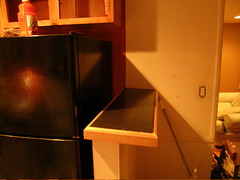
Pass Through

kitchen30
Originally uploaded by Michael Browne.
Prompted by Dad, I'm posting more pictures of the kitchen.
I'm not entirely satisfied with this piece--note in the left corner where I miscalclated the cut. Instead of starting over, I just popped a small piece to fit the gap.
This piece, however, is great because it fit the sill perfectly. No need to bolt it down or use brackets...it's just sitting there, content, most likely to never move again.
Countertops!
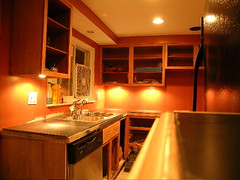
kitchen29
Originally uploaded by Michael Browne.
So OK, the trim is still being varnished and cut to fit, and so what if the dishwasher doesn't draw water from the line at this point---who cares? Not me, cause this is the first time in six months (wait, 7 and a half) that I've cleaned my dishes in a kitchen sink. Woo Hoo!
But back to the countertops-- After cutting them, I set them in place using thinset. Then, I cleaned them and used this sealer that fused with the slate to create a stain/water resistant surface. Then, I finished it off with high gloss finish to create a more durable surface. I still have to put another 2 coats on it.
I initially planned to reuse a sink a friend gave me, but when I thought about it, I couldn't bare to put a crappy sink in an otherwise brand new kitchen. So, here it is... with new faucet, as well!
Finishing touches will come soon, but I'm outta here for the trade show in Vegas for a few days. Come October, I'll be rockin a fully finished kitchen!
Saturday, September 17, 2005
The Neighbors Must Hate Me
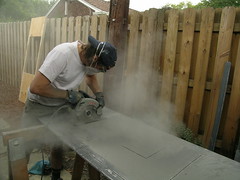
kitchen28
Originally uploaded by Michael Browne.
Another big thanks to Mags for catching one of few in-action shots.
But really, the neighbors must hate me with all the dust I kicked up. At one point, we stopped cutting and looked out onto the main street, where a large cloud floated through traffic. Thankfully, the old trade winds carried it away before entering my house.
Uh... So What Do We Do?

kitchen27
Originally uploaded by Michael Browne.
I find myself asking this a lot... but when it came to the corners for the stone, I was pretty nervous, as the 90° corner was sure to chip when I cut into it. You can see in the picture here how we made a dummy cut in a piece we wouldn't use.
I realized that the corner would need to be slightly rounded, so rather than run the blade all the way to the edge, I stopped about 2" short. Once I'd cut all four sides the same way, the middle piece dropped out, leaving four pieces on the side. I used the saw and, rather than coming in straight on, I swayed the saw side to side, creating a nice, rounded, unchipped corner. Brilliant!
Mags Saves the Day
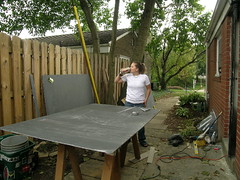
kitchen26
Originally uploaded by Michael Browne.
Sometimes it takes a little nudge from someonoe else to get the momentum rolling.
Last night , Bryan and Traci showed up with the needed plywood to finish building the countertop base. Bry and I cut the pieces and then headed back to the Depot to pick up a sink and the necessary attachments for the disposal, faucet and dishwasher.
And then today, Miss Maggie Gesue showed up to help me cut the chalkboards into shape. In this picture, she's slamming a green tea to work off her hangover from last night.
Cutting wasn't that hard, but lifting them in place sure was! Mags has some guns and she helped me hoist the stone into place. We traced the sink outline and the used a diamond blade on the circular saw to cut through the slate. We taped the cut-line to reduce chipping.
![]()
